
I have written previously about the ’golden hour’ and the ’blue hour’ being very special times in the day when the specific nature of the light at these times gives opportunity to take some fabulous images with particular emphasis to either warm or cool tones.
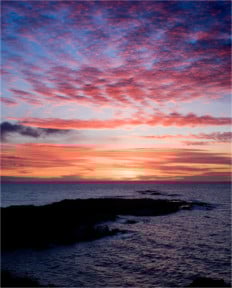
And then there are sunsets - what photographer hasn’t shot a sunset?
They are a very popular choice for image taking, with universal appeal, and for good reason.
The light will give super-saturated colour to your subject - fabulous yellows, and deep oranges and reds for a spectacular effect.


.jpeg?width=209&height=140&crop=209:145,smart&quality=75)
But firstly, taking a shot of a sunset requires care - shooting straight into the sun (particularly with a high power lens such as 200-300mm) can cause eye damage - so do use the LCD rear screen to arrange your composition.
Plan your shots in advance if possible so that you know the time for the sunset and can prepare your equipment in plenty of time.
The good news is that almost any lens is suitable, from the standard ’kit lens’ often supplied with your initial purchase (usually an inexpensive modest zoom in the range 25-70mm) to more expensive prime or zoom lenses from wide-angle to telephoto.
Having said that, wide-angle lenses are more frequently used for landscapes as they enable the photographer to include more of the scene - and with the sun smaller in the frame than with a telephoto, reducing or overcoming some of the flare and highlight issues found when shooting into the sun.
A tripod is always suggested, together with use of the self-timer, as this will negate any camera shake problems. In addition, use of aperture priority (the A or Av seen on your command dial, and set with a high number/small aperture such as f11) is recommended as this will give the widest depth of field and ensure a sharp image from close up through to infinity, usually necessary for landscape images.
A low ISO such as 100-200 is also normal as this maximises quality and will reduce any tendency to ’graininess’ seen in high ISO images.
When shooting the sun, a major issue is the wide dynamic range you are trying to capture in your images - from the bright light of the sky and sun itself (giving blown-out highlights) through to some deep shadows inevitably produced by the backlighting (perhaps leading to ’blocked out blacks’ in the image with a total loss of detail).
Shooting in RAW, described as an undeveloped negative giving maximum opportunity to adjust the final image, is always to be preferred to shooting in jpeg.
More experienced photographers will also often have graduated neutral density filters in their camera bags to address this problem.
These are either squares of resin or glass placed in holders in front of the lens, or circular and screwed into the lens front - and comprise a ’dark’ area and a transparent area.
The dark area is to reduce the bright light seen in the sky and sun, the transparent to allow detail in the landscape and foreground to be captured.
Such filters are available in different strengths to enable the light to be balanced between the sky and the foreground and allowing full detail to be captured throughout the image.
Including clouds in your images is often advantageous - hiding the sun behind a cloud will diffuse the light, reducing the flare and highlight problem as well as introducing interesting formations and colours in the sky.
The island is blessed with numerous places on our coast to capture some great sunset images - beaches, the sea, the piers at Peel or Port Erin, the rocky headlands at Bradda, Niarbyl or the Sound are some suggestions for places where the interplay between sunlight, shadows, reflections on water and glorious saturated colours will provide stunning opportunities.
The images accompanying these article are by members of the Isle of Man Photographic Society who will always give a warm welcome to new members and be happy to share their experiences, and give advice to help develop your skills.
Have a look at our website - www.iomps.com or our Facebook page for lots of ideas to stimulate your interest.
Chris Blyth
Comments
This article has no comments yet. Be the first to leave a comment.