
I suspect that, like me, most readers will have gazed at the night sky and thought how tiny we are in the great scheme of things - all those little spots of light and at such great distances - and been amazed when we get the opportunity to see some of the photographs from the Hubble telescope of star clusters, galaxies and nebulae.
The Isle of Man is blessed with the benefit of multiple ’dark sky’ sites - sites with little light pollution and allowing unrivalled views of the night sky to reveal the wonders of our universe, with the naked eye for a superficial view, and with telescopes and cameras to see even further into deep space.
But even photographing the moon - our closest neighbour - requires careful thought and preparation.
Let’s start with some basic equipment.


First, because of distance (and the moon is a quarter of a million miles away, and relatively small in the sky), camera shake is likely to be a problem so a tripod is an essential item to ensure a sharp image, whilst a long lens of at least 250mm equivalent will help provide a reasonably sized result.
Sharpness will also be helped if you use the camera self-timer - it’s in the menu settings of all modern cameras and means that there is a delay of typically 2-12 seconds after you press the shutter button before the shutter releases.
The delay will ensure a perfectly stable camera at the instant the shot is taken.
The next difficulty is that the moon’s surface when seen at night is surprisingly bright against a predominantly dark background.
The sensor in your camera is calibrated to produce an ’average’ of all the colours - ie to cover the full range from black to white.
But the average of black and white is grey - so if you use the ’automatic’ setting on your camera, the resulting image from a scene which is predominantly black with just a little white (such as the night sky) will tend to be over-exposed.
The moon will thus appear as a pure white ’blob’ in your image, and all detail of the craters and mountain ranges lost.
So manual settings are necessary.
A good starting point is ISO 100 for maximum quality, and an aperture of f11 at 1/125th - and be prepared to adjust the shutter speed up or down as necessary to get the best result.
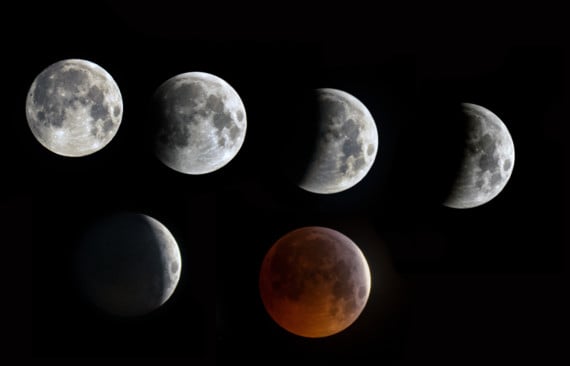
Whilst the full moon is perhaps the most frequently shot, the direct light falling on the surface produces a rather ’flat’ result, with few shadows giving any modelling or texture.
An image taken during the waxing or waning phases, however, when there is side-lighting, gives a much clearer idea of the rugged nature of the surface, as in one of our images from Sue Jones.
I would also suggest manually focussing the lens - the moon will appear quite small in the viewfinder and some lenses may struggle to focus correctly - so do include a small headlamp or torch in your equipment as this will allow you to make minor adjustments to your camera at night.
In terms of composition, taking your shot when the moon is low on the horizon will allow the inclusion of a foreground of trees or of buildings such as a church tower and which will give scale to your image and add to the interest.
And shoot in ’RAW’ if you can, it’s a format often described as an undeveloped negative which records a much wider dynamic range of image information than jpeg files, and will allow you the maximum opportunity to process your images and adjust for the very best results.
Finally, practice is always good - be patient, accept that some of your images will be less than satisfactory but learn from your mistakes.
Belonging to a camera club such as the Isle of Man Photographic Society will give opportunity to swap experiences with fellow members and to develop your skills. Have a look at our website - www.iomps.com or our Facebook page for lots of ideas to stimulate your interest.
Chris Blyth
Comments
This article has no comments yet. Be the first to leave a comment.