
Just because sunset has been and gone and light disappeared from the sky doesn’t mean it’s time to put your camera away - indeed, night-time gives the opportunity to capture some great shots with real impact.
And because you are probably one of the few doing it, adding to your skills as a photographer, learning about long exposure settings and how to handle light (or rather the lack of it) in difficult circumstances.
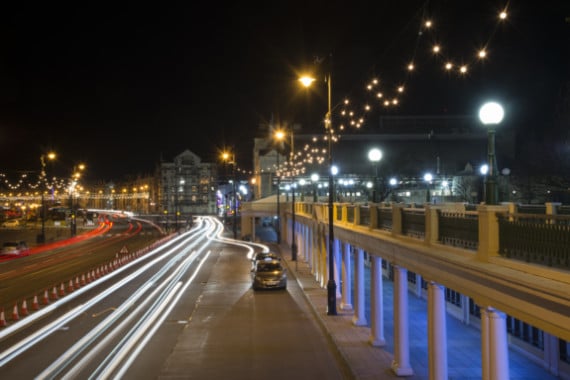
In an earlier article, I covered shooting during the ’blue hour’ - that twilight period after sunset but before true night when there is still some light in the sky, when cool, blue tones are emphasised, as seen here in Chris Nicholls’ shot Blue Time.
But as the night develops, photographers become evermore dependent on artificial light to get their shots, which introduces its own difficulties.
.jpeg?width=209&height=140&crop=209:145,smart&quality=75)

Be aware that light has a temperature measured in degrees kelvin - and artificial light from light bulbs or street lamps has a dramatically different kelvin from daylight, and which will introduce a strong colour cast to a night-time image.
A candle has a kelvin rating of approximately 1800-1900K, so lacking blue wavelengths and resulting in a yellow / orange cast, standard household incandescent bulbs are rated around 2800-2900K so less orangey / more blue, whilst light at midday is closer to 5500-6000K.
Cameras have various menu settings to compensate manually for these changes as well as an ’automatic white balance’ usually set as the default. Shooting in the RAW format if available is always recommended as this allows post-production adjustments to white balance.
With night-time, long exposures become fairly standard, requiring the use of a tripod to get sharp images, as well as a shutter cable release or use of the self-timer (the latter usually available in the menu settings and allowing a delay of 2-12 seconds before the shutter is triggered).
Whilst the aperture and shutter settings are the basic tools for getting the correct exposure, there is a third element in exposure with digital cameras which is the ISO setting.
This is the direct equivalent of changing ones film from, say, a ’slow’ one such as Fuji Velvia rated at 100 ISO to the ’faster’ Fuji Venus rated at 800 ISO.
In the same way the selected aperture affects the exposure (a change from f2.8 to f4 halves the light entering the camera for example, requiring twice the speed setting to get an equivalent exposure), so the ISO setting also impacts on exposure.
Changing the ISO from 100 to 200 is the same as changing the shutter setting from 1/250th of a second to 1/500th, or of changing the aperture from f4 to f2.8.
Shooting at night might encourage using a much higher ISO setting such as 800 or 1600, thus allowing a much faster exposure to capture the shot.
But although the latest camera sensors have considerably improved performance in poor light, an increase in ’graininess’ (also called ’noise’) is likely in the deep shadow areas of your shots. To mitigate this problem, most computer imaging software such as Photoshop includes processes to reduce noise.
So what sort of shots are suggested?
Well, firework displays, light trails from car headlamps, street or cityscapes, reflections on water, architectural shots of buildings are all eminently suited to night photography - as seen in the two images by Sue Jones.
The images accompanying these article are by members of the Isle of Man Photographic Society who will always give a warm welcome to new members and be happy to share their experiences, and give advice to help develop your skills. Have a look at our website - www.iomps.com or our Facebook page for lots of ideas to stimulate your interest.
Chris Blyth
Comments
This article has no comments yet. Be the first to leave a comment.